When it comes to trade show signages, there are too many options and never enough time to test each one. Between banners, backdrops, pop-ups, and modular systems, it’s easy to overthink or choose something that looks good online but fails on the show floor. This guide breaks down must-have decisions versus nice-to-haves, so you can focus on what actually matters and avoid costly mistakes.
1. Start With Your Booth Size and Layout
Why This Matters
Your booth size determines what you can legally install, how visible you are from the aisle, and how people move through your space. Choosing a display before understanding your layout often leads to cramped booths, blocked sightlines, or graphics that don’t fit.
What to Consider
- Your assigned booth size (most commonly 10’ x 10’ or 10’ x 20’)
- Inline, corner, or peninsula placement
- Height and structure restrictions set by the event
- Where tables, monitors, or product demos will sit
Must-Haves
A display-sized specifically for your booth dimensions that keeps walkways open and sightlines clear.
Nice-to-Have
Modular components that can be rearranged if your booth size changes in future shows.
2. Set a Realistic Budget (Short-Term vs Long-Term)
Why This Matters
A low upfront cost can be misleading. Displays that are cheap but flimsy often need replacing after one show, costing more over time than a reusable system.
What to Consider
- One-time event vs multiple shows per year
- Shipping, storage, and replacement graphics
- Whether you want a full display system or print-only signage
Must-Haves
A display that fits your current budget and delivers value beyond a single event.
Nice-to-Have
Interchangeable graphics or expandable systems that let you refresh messaging without buying a whole new setup.
3. Factor in Portability and Setup Time
Why This Matters
Trade show days are long, and setup windows are short. Heavy or complicated displays add stress, increase labor costs, and raise the risk of delays.
What to Consider
- Weight and packed size
- Tool-free or low-effort assembly
- Whether one person can handle setup
Must-Haves
A display your team can confidently set up without specialized tools or extra labor.
Nice-to-Have
Lightweight carry cases and compact storage that simplify transport and teardown.
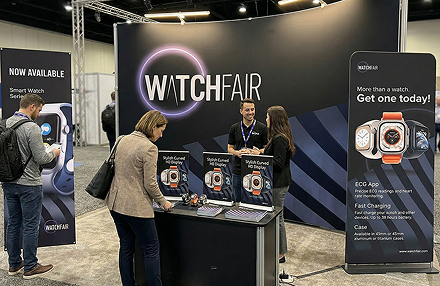

4. Prioritize Clear Branding and Messaging
Why This Matters
Attendees decide whether to stop at your booth in seconds. If your message isn’t immediately clear, they’ll keep walking.
What to Consider
- How your booth looks from 10 to 20 feet away
- Logo placement and brand consistency
- Readability, contrast, and visual hierarchy
Must-Haves
One clear message or value proposition that’s easy to understand at a glance.
Nice-to-Have
Secondary visuals or supporting copy that adds depth without overwhelming the space.
Common Trade Show Booth Display Mistakes to Avoid
Focus on essential print marketing products that will help effectively convey your brand’s story, products, and special offers. Consider items that are easy to take home for attendees and use a consistent look across all items to create a more professional appearance.
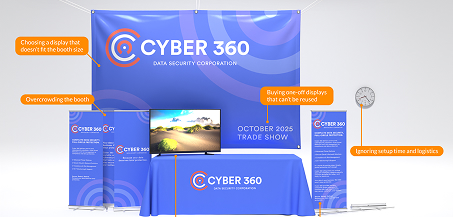
Choosing a Display That Doesn’t Fit the Booth Size
A display that’s too large can crowd your booth or break event rules, while a display that’s too small can make you easy to miss.
Avoid this by confirming your booth dimensions, orientation (inline vs corner), and height limits before ordering your display.
Overcrowding the Booth
Too many banners, tables, and products can overwhelm visitors and block foot traffic. Avoid this by planning your layout around one main focal point, keeping walkways open, and leaving breathing room for conversations and demos.
Prioritizing Looks Over Portability
That oversized or ultra-polished display may look amazing online, but it can become a headache once you have to transport and assemble it. Avoid this by choosing lightweight, packable displays and confirming setup can be done quickly by your team.